As if the pandemic weren't bad enough, my dad passed away this summer. He was the best dad anyone could have asked for, a great provider for our family, a trusted advisor for finances, fiercely patriotic and political, a gentle grandfather, loyal employee, and religious church member. He was loved and remembered across generations, churches, jobs, and neighborhoods. The process of putting together his memorial video and then experiencing the hundreds of people who came to pay their respects and support our family was... overwhelming. It's been just over 2 months and I'm still in the "denial" stage of grief. Here's his obituary.
There are a few things of his I wanted to remember him by: a few TCU shirts and hoodies, a gray London Fog hat that he always wore to keep his bald head warm when it was cold, and a few of his Hawaiian shirts, which were practically his uniform for many years. My husband can wear a couple of them, one was small enough to fit my 11 year old, but I wanted to upcycle some of them into dresses for me and my daughter. Every time we wear them we will remember him. <3
Turning a boxy man's shirt into a garment for someone who is curvy takes some work, a little spacial awareness, and some seamstress tricks. I've tried to capture it here as a tutorial for my sister and anyone else who might find it useful. I can't say I enjoyed doing it, but it was a labor or love, and I'll continue to iterate on them as I complete the rest.
Step 1: Make a Plan
Lay your shirt out on a flat surface. Identify what parts you want to keep, change, or remove. I wanted to keep the collar and button-down details on this one, but make the sleeves shorter and remove the front pocket since chest pockets draw attention to areas on which I don't need any more attention. :)
Rip out seams with a seam ripper, or make cuts along seams if you don't have the patience to rip out the multiple layser of seams that tend to be on high-quality garments. I was VERY careful and meticulous about ripping the seams for the pocket since one wrong move would have put a hole in the main part of the shirt that couldn't be easily repaired.
This is a couture process since there's no pattern to follow. Put the shirt on your body inside out so you can make changes and pin them the way you want to sew them.
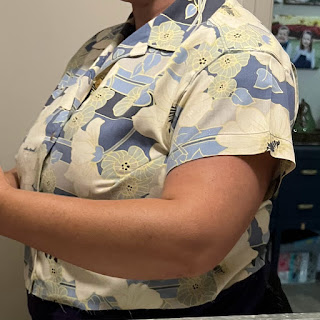
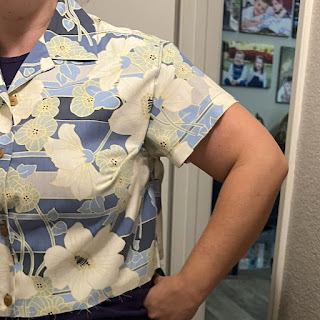
As you can see, my bust and stomach fill out the main body of the shirt, but the sleeve holes leave unflattering gaps. I can already see that I'm going to shorten the shirt to my natural waist and add an A-line skirt, and that I'll need to add darts to the bust area to more closely flatter my curves.
If you've never sewn darts before, here's a good tutorial. Fold the fabric at the sleeve until the triangle dart matches the curvature of your body, then follow the point down to point to the center of the... curvy area. :) Do the same on both sides; you can always compare them when you're done to make sure they're in the same general area.
Pin the side seams if you need a smaller or tapered waist; I did this to reduce the sleeve gap as well.
I chose the button that I wanted to be the last button on the dress, just above my natural waist. Then I trimmed the shirt's length about 2 inches lower than that button. and put it back on my body to assess what the back would look like. It was difficult to take a photo without it bunching up with me raising my arm. but you can feel free to add back darts if you need more shaping in that area. The other option is to shorten it even more to be an empire waist but I wasn't willing to go that high for fear of it looking like a maternity dress.
Make sure you KEEP all of the scraps you're cutting; you could make a coordinating headband or waist tie from the remnants.
Step 6: Check Twice, Sew Once
As you can see, bringing in the side seams and adding darts has changed the shape and fit dramatically. Make sure that you don't take in too much, if you have a button gap. I planned on sewing the button area closed anyway since I nearly ALWAYS have a gap as I move in a garment unless it's super flowy, and I don't like the shapelessness of super flowy things (so I don't generally buy anything that's button-down for myself).
 I could have taken in more at the waist, but since I was planning on sewing the button area closed and wasn't adding a zipper, I decided against it and had in the back of my mind that I would probably end up adding a waist tie for additional shaping later.
 At this point, go ahead and sew the darts and side seams so we can pin the sleeves.
Step 7: Sleeves
The classic hawaiian shirt sleeves were too long for a feminine fit. If you're not an experienced sleeve seamstress, it may surprise you that sleeve edges where they join a shirt / dress are curved when they lay flat. This allows them to lay flat and more with your arms when you're wearing them.
Shorten ths sleeves loosely following the original curve of the sleeve. These sleeves taper a bit toward the hem, so the circular opening created with the cut will be slightly smaller than the original (think of cutting a watermelon right in the middle at its widest point, versus cutting it closer toward the end - the cross-sections you create closer to the end will have a smaller circumference). That's ok though - we made the arm opening smaller with the dart. Just roll with it - you can always make the sleeve opening smaller by re-joining the under-seam.
 Pin the sleeves to the shirt sleeve opening, matching the top crease with the crease on the top of the shoulder, and the under-seam to the shirt side-seam. Ease your way around, use more pins along the seam, because we're going to put it on one more time befroe sewing them on.
  Assess the fit one last time before you sew the sleeves on - I love how this method allows me to keep the original hem detail wihtout having to re-create it myself, but doesn't swallow my arm up like the orgiinal sleeves did.
Again, since we don't have a pattern, I just used a dress I already knew fit me will, and used it as my guide.
This dress has more of an empire waist fit so I laid the shirt down to give me a better waist guide. Then I just cut around the skirt and underneath the dress and shirt.
This should be the easy part! Lay the skirt front and back out, centered on their respective shirt faces. Pin them in place, then pin the skirt sides together, right-sides facing. Sew the skirt back and front together, then join the shirt to the skirt at the waist hem.
Step 10: Try the dress on one more time to determine whether you want to make it shorter and how wide you want your hem to be. Since my skirt material is a stretchy knit, I used a zig-zag stitch to make a 1" hem.
Step 10: (Optional) Make a Coordinating or Contrast Waist Tie
I found that I wanted a bit more shaping on my waist, so I made a waist tie from some of the scrap material.
(Stay tuned for the final photo after I make my waist tie)


