Sunday, October 9, 2022

Remembering Daddy: Upcycling Hawaiian Shirts into dresses

It's been several years since my last post. Things got a little busy what with having babies, moving halfway across the country, changing jobs, and... oh yeah... a global pandemic. 

As if the pandemic weren't bad enough, my dad passed away this summer. He was the best dad anyone could have asked for, a great provider for our family, a trusted advisor for finances, fiercely patriotic and political, a gentle grandfather, loyal employee, and religious church member. He was loved and remembered across generations, churches, jobs, and neighborhoods. The process of putting together his memorial video and then experiencing the hundreds of people who came to pay their respects and support our family was... overwhelming. It's been just over 2 months and I'm still in the "denial" stage of grief. Here's his obituary

There are a few things of his I wanted to remember him by: a few TCU shirts and hoodies, a gray London Fog hat that he always wore to keep his bald head warm when it was cold, and a few of his Hawaiian shirts, which were practically his uniform for many years. My husband can wear a couple of them, one was small enough to fit my 11 year old, but I wanted to upcycle some of them into dresses for me and my daughter. Every time we wear them we will remember him.  <3 

Turning a boxy man's shirt into a garment for someone who is curvy takes some work, a little spacial awareness, and some seamstress tricks. I've tried to capture it here as a tutorial for my sister and anyone else who might find it useful. I can't say I enjoyed doing it, but it was a labor or love, and I'll continue to iterate on them as I complete the rest. 

 Step 1: Make a Plan

Lay your shirt out on a flat surface. Identify what parts you want to keep, change, or remove. I wanted to keep the collar and button-down details on this one, but make the sleeves shorter and remove the front pocket since chest pockets draw attention to areas on which I don't need any more attention. :)    

Hawaiian shirt laying face-up and flat on a cutting board.Step 2: Deconstruction

Rip out seams with a seam ripper, or make cuts along seams if you don't have the patience to rip out the multiple layser of seams that tend to be on high-quality garments. I was VERY careful and meticulous about ripping the seams for the pocket since one wrong move would have put a hole in the main part of the shirt that couldn't be easily repaired. 
Hawaiian shirt with sleeves and front pocket removedStep 3: Assess the Situation

This is a couture process since there's no pattern to follow. Put the shirt on your body inside out so you can make changes and pin them the way you want to sew them. 

As you can see, my bust and stomach fill out the main body of the shirt, but the sleeve holes leave unflattering gaps. I can already see that I'm going to shorten the shirt to my natural waist and add an A-line skirt, and that I'll need to add darts to the bust area to more closely flatter my curves.
Me wearing the button-down shirt inside-out to assess fitStep 4: Pin Darts Strategically and Bring in Side Seams

If you've never sewn darts before, here's a good tutorial. Fold the fabric at the sleeve until the triangle dart matches the curvature of your body, then follow the point down to point to the center of the... curvy area.  :) Do the same on both sides; you can always compare them when you're done to make sure they're in the same general area.

Pin the side seams if you need a smaller or tapered waist; I did this to reduce the sleeve gap as well. 
Me wearing the shirt turned to the side to show pinning a dart at the sleeve and bust areaStep 5: Trim the Length and Re-assess

I chose the button that I wanted to be the last button on the dress, just above my natural waist. Then I trimmed the shirt's length about 2 inches lower than that button. and put it back on my body to assess what the back would look like. It was difficult to take a photo without it bunching up with me raising my arm. but you can feel free to add back darts if you need more shaping in that area. The other option is to shorten it even more to be an empire waist but I wasn't willing to go that high for fear of it looking like a maternity dress.  

Make sure you KEEP all of the scraps you're cutting; you could make a coordinating headband or waist tie from the remnants.
Me wearing the shirt right-side out and turned around to face the back
Step 6: Check Twice, Sew Once

As you can see, bringing in the side seams and adding darts has changed the shape and fit dramatically. Make sure that you don't take in too much, if you have a button gap. I planned on sewing the button area closed anyway since I nearly ALWAYS have a gap as I move in a garment unless it's super flowy, and I don't like the shapelessness of super flowy things (so I don't generally buy anything that's button-down for myself).


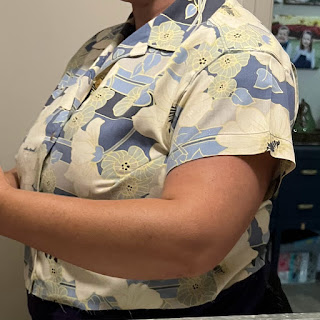
Me wearing the shirt after pinning alterations, still without sleeves.I could have taken in more at the waist, but since I was planning on sewing the button area closed and wasn't adding a zipper, I decided against it and had in the back of my mind that I would probably end up adding a waist tie for additional shaping later. 
Me wearing the shrit right-side out, turned to the side to show the dart fit

At this point, go ahead and sew the darts and side seams so we can pin the sleeves. 

Step 7: Sleeves

The classic hawaiian shirt sleeves were too long for a feminine fit. If you're not an experienced sleeve seamstress, it may surprise you that sleeve edges where they join a shirt / dress are curved when they lay flat. This allows them to lay flat and more with your arms when you're wearing them.

Shorten ths sleeves loosely following the original curve of the sleeve. These sleeves taper a bit toward the hem, so the circular opening created with the cut will be slightly smaller than the original (think of cutting a watermelon right in the middle at its widest point, versus cutting it closer toward the end - the cross-sections you create closer to the end will have a smaller circumference).  That's ok though - we made the arm opening smaller with the dart. Just roll with it - you can always make the sleeve opening smaller by re-joining the under-seam. 


Shirt sleeve lying flat on a cutting board, trimmed to match the original curvature but about half the length.Pin the sleeves to the shirt sleeve opening, matching the top crease with the crease on the top of the shoulder, and the under-seam to the shirt side-seam. Ease your way around, use more pins along the seam, because we're going to put it on one more time befroe sewing them on. 
Shirt laying flat on a cutting board, showing  how to fit the sleeve to the sleeve opening and pin it as it will be sewn.Assess the fit one last time before you sew the sleeves on - I love how this method allows me to keep the original hem detail wihtout having to re-create it myself, but doesn't swallow my arm up like the orgiinal sleeves did.
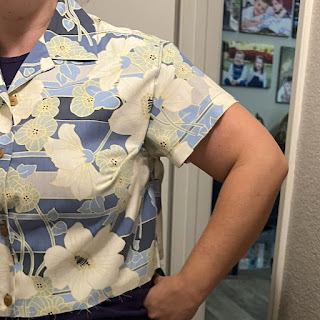
Me wearing the shirt, turned to the side, after the new sleeve has been attached.
Me wearing the shirt, facing the front, after the new sleeve has been attached.Step 8: Cut the Skirt

Again, since we don't have a pattern, I just used a dress I already knew fit me will, and used it as my guide. 


This dress has more of an empire waist fit so I laid the shirt down to give me a better waist guide. Then I just cut around the skirt and underneath the dress and shirt.
Step 9: Pin and Sew the Skirt

This should be the easy part! Lay the skirt front and back out, centered on their respective shirt faces. Pin them in place, then pin the skirt sides together, right-sides facing. Sew the skirt back and front together, then join the shirt to the skirt at the waist hem. 

Step 10: Try the dress on one more time to determine whether you want to make it shorter and how wide you want your hem to be. Since my skirt material is a stretchy knit, I used a zig-zag stitch to make a 1" hem. 

Step 10: (Optional) Make a Coordinating or Contrast Waist Tie

I found that I wanted a bit more shaping on my waist, so I made a waist tie from some of the scrap material. 

(Stay tuned for the final photo after I make my waist tie)

Wednesday, March 15, 2017

Lunch For A Bunch Recipe - With Pictures!

Several of my friends have attempted to make Lunch for a Bunch (AKA LFAB) and have failed. Or worse, they haven't even attempted it for fear of failing!

Fear no more - this post is to enlighten those who have not had the benefit of watching someone make this delicious meal in person, which I took for granted since I watched my mom make them throughout my childhood and learned the fine art of LFAB from the master herself.

It's not too difficult, but there are several tricks that aren't mentioned in the original recipe that's made its way through the grapevine. Once you've made a few, you won't even need the recipe anymore. Enjoy!


Lunch for a Bunch


This is a family favorite that I use every time I bring food to a new mom or a family in need, because it’s so tasty and reheats very well!  6-10 servings depending on serving size.

Ingredients
  • 1 pkg. Pillsbury Hot Roll Mix
  • For prep ease, the ingredients required to prepare as directed are:
  • 1 c hot water
  • 2 tbsp butter, melted
  • 1 egg
  • 2-3 c. grated cheddar cheese
  • 1 pkg. (16 slices) ham lunch meat
  • ¼ c. butter, melted
  • 1 T dry Hidden Valley Ranch dressing mix

  • Pillsbury Hot Roll Mix can be hard to find. I've had good luck finding it at Albertsons/Vons/Safeway, and sometimes at WalMart. If your store carries it, it will be on the baking aisle with the flour and other box mixes. It used to be in a blue box, but about a year ago they re-branded into a yellow box.  Of course the Dough Boy makes an appearance.  Hoo-hoo!

    Hot Roll Mix - thank you Pillsbury Dough Boy!
    Ingredients needed to prepare hot roll mix as directed

    The other ingredients are not hard to find - the Ranch dressing mix will be with the salad dressing, etc. Grate your cheese and get your ham open before you start on the dough so assembly will go smoothly and quickly.

    Ingredients to assemble the LFAB

    One other thing I like to use (but my mom never had while I was growing up) is a silicone bundt pan.  Any bundt pan will do, but having a silicone one makes things a lot easier because you don't have to spray/grease it - the LFAB slides right out no problem.


    Directions

    Prepare dough as directed on package, but DO NOT LET IT RISE AS DIRECTED. If you make the mistake of letting it rise, you will not be able to roll it out flat.  I like to pull an Alton Brown and mix the dry team first (mix + yeast) then add the wet team after (water, egg, butter).  Make sure your water is hot, not warm or boiling - its heat is what wakes up the yeasties to do their thing.  

    Dry Team

    All mixed up - it is supposed to be wet and sticky.

    Now it's time to knead and roll. HEAVILY FLOUR YOUR KNEADING/ROLLING SURFACE. I have a nice silicone mat I use, but you could even use your counter top as long as you flour it to prevent sticking. 

    No really, lots of flour.

    Knead the dough 10 times. I took a ceramics class in college so I could do this all day. Very relaxing.

    Kneaded and ready to roll


    Unless you have a non-stick plastic roller, you'll want to flour your rolling pin and/or dust some flour on top of the rolled-out dough periodically to keep it from sticking. Roll dough into an 18x24 rectangle.


    Rolled and ready for layers of deliciousness


    Mix dry Ranch dressing with the 4 tbsp of butter. I use a small prep bowl to melt the butter in the microwave and a fork to "scramble" the ranch dressing powder into it. I pour the mixture evenly around the rectangle before spreading so I don't have to drag too much across to the corners. Then I use a silicone brush to smear it over the dough. A flat spatula works just as well.

    Mix
     
    Pour
     
    Smear


    Sprinkle on cheese, then position ham slices in one layer, with slightly overlapping edges. 

    Cheeeeeeese
     
    Meeeeat

    Roll up tightly starting from one long end and pinch ends. Carefully place seam side down in your Pam-sprayed (or silicone) bundt pan.

     
    Ready to rise

    Cover with a clean towel and let rise in a warm place for 1 hour. I use my microwave since it just got steamy heating up the butter and water I used to mix the dough. It may not look much different to you but compare the previous and next pictures. You can see it's bigger and puffier after rising.


    Bake at 325° for 40-45 minutes depending on your oven. It should be GBD (Golden Brown and Delicious). Let cool in the pan for 10 minutes. If you turn it out too early, it will completely lose its shape due to gravity. 
    Mmmm GBD!


    Turn out onto serving platter or cooling rack to serve or continue cooling. If you've never done this, here's a tip - put the platter/rack upside down on top of the bundt pan, hold both on either side, and turn them at the same time. Remove the bundt pan (which is now on top) and viola! You have revealed the beautiful bundt shape on top.


    Can't you just taste it already?


    Serve warm or make ahead of time and reheat in the microwave or a toaster oven. Make your own variations - we've tried turkey & swiss and swapping the ranch for marinara and using pepperoni and mozzarella!


    Mmmm just the right balance of bread, cheese and meat.


    My kids love carrots with the greens still on top.  They also love LFAB.


    Monday, September 12, 2011

    Everyone, meet Caleb!

    Well I'm 3 weeks late with this post but can you blame me?  I've been a little busy.  :-P 

    Caleb was born 6 days late at 1:21 pm on Thursday, 8/18/2011.  He was 8 lb 2 oz, 19 1/4 inches long, happy and healthy!

    Here, have some pictures!


    Wednesday, August 3, 2011

    39 weeks

    Yes I am indeed still pregnant.  :-P  Every day that passes makes it more likely that tomorrow is the day, right?  :-)

    Everything is great, now it's just a waiting game.  Glad things seem to be winding down on the 2 projects I'm involved in at work.  Makes it easier to not stress about passing things on when Caleb does eventually come.

    That's it for now!  Can't wait to introduce Caleb to everyone.  I just know he's going to be adorable like his dad.  :-)

    Monday, July 25, 2011

    37 weeks! Holy Moly!

    Well Caleb is officially full term!  I'm starting week 38 and man oh man is it hot!  We're at 20+ days over 100 degrees in a row, so I'm staying inside a lot, and sometimes I venture out to someone's pool.  :-P  I think I'm going to start walking around the half-acre backyard in the mornings.  I used to take the pups on walks earlier in my pregnancy, but being so close to the end and it being so hot, I don't think it's a good idea to be that far from home by myself in the heat anymore.  Hopefully the pups don't mind me walking around in circles.  I'm sure they'll think I'm nuts!


    Just like I'm sure most new moms are, I'm a mix of anxious, nervous and excited.  I can't wait to meet the little alien who's been kicking my spleen for 9 months, but I know there's only one way to get him out!  Hopefully the delivery will go smoothly without complications.  But even if not, Heath will be there, Shelley will be there, and my doctor and nurses will be there, so I'll be ok.  Here's hoping Caleb comes sooner rather than later... it could be today, it could be a month from now!  We'll surely post pictures when the big day comes!  :-)

    For now, here's a picture of me and my gigantic belly!


    Monday, July 11, 2011

    35 weeks... home stretch!

    Well, Caleb is almost officially full term!  It's only a matter of time now  :-)  We can't wait to meet him and find out who he's going to be.  Everything is going well, I don't have much to complain about (no swelling, low BP, etc).  We had a couple of great baby showers and have everything we need... except the baby!  :-)  Here's hoping everything goes smoothly and Caleb makes his debut happy and healthy in the next few weeks!

    Sunday, June 5, 2011

    10 weeks left!

    What's up blog followers?  I really hope I get better about posting here since not everyone in our circle of family/friends does Facebook, which is where I normally post stuff.  Let's see, what's happened in the last few months?

    We recently got a 3D sono and it turns out Caleb is a little Heath clone, hee hee. We already have a ton of hand-me-down clothes from friends, which is a great blessing.  I'm getting a little overwhelmed with all the baby paraphernalia since I know virtually nothing about caring for an infant, but we're signed up for some classes at the hospital and I'm sure my mom and MIL will be over here a lot telling what I should and shouldn't be doing. I just want him to get here happy and healthy - I'm sure we can figure the rest out from there. :-)

    The first question people have been asking me when they find out I'm expecting is whether I'll be going back to work. Of course I am, I work from home, I don't have much of an excuse not to. ;-) I'll probably take 10 weeks or so off, depending on how much short-term disability pay I can get my Dr. to approve me for.

    After that the questions get a little more personal, like, will I be getting an epidural and such. I think there's enough proof that natural childbirth is in general better for mom and baby, that we're going to try the Bradley Method of husband-coached natural childbirth. We're not going through the 12-week course or anything - I just got a book about it - but I figure I did so much yoga-type breathing to get past my nausea the first 4 months of this pregnancy that I can maybe use the same technique to get through labor. It's hard to say because I have no idea what my pain tolerance will be, and I'm not so hardcore that I'll refuse to get an epidural if I really need one. I've had so many friends have great experiences with them. I guess I just want to try to go all-natural and if it doesn't work out, it doesn't work out. Kinda sounds like a cop-out but that's actually the attitude my Dr. recommends - she says the people who have these set-in-stone birth plans where XYZ will happen no matter what are the ones who have the most complications and end up having the exact opposite birth experience they want. Like I said, I just want him here happy and healthy, and the rest we'll figure out when we get there. :-)

    Anyhow, that's pretty much my life right now. I've got 10 weeks left till my official due date. Seems like a short amount of time when I say it that way. 2 1/2 months sounds longer, I'll go with that. ;-)